How to Make the Most Unique Farmhouse Cake Stand
If you’re looking for the most unique cake stand that no one else has you’ll LOVE this DIY! I want to teach you step-by-step how to make the most unique farmhouse cake stand for your next birthday party, baby shower, or wedding! And I want to teach you this because I want you to get showered with compliments from your friends and family… and I guarantee it will happen!
They’ll first inquire where on earth you got this amazing one-of-a-kind cake stand because they’ve never seen one like it before (because they don’t exist ;) and then their jaw will drop when you tell them that
1. It’s made from a salvaged porch column
2. That YOU made it!
I’m all about repurposing something old into something new and functional for my home. When I kept coming across porch post bases and pillar capitals at salvage mills I thought there had to be some sort of easy DIY a gal could do using them.
P.S. They're one of my favorite things to find at vintage markets! To see other items on my favorites list be sure to download my free checklist HERE - My 50 Favorite Flea Market Finds- Download it, print it off, and take it with you next time you out junkin'!
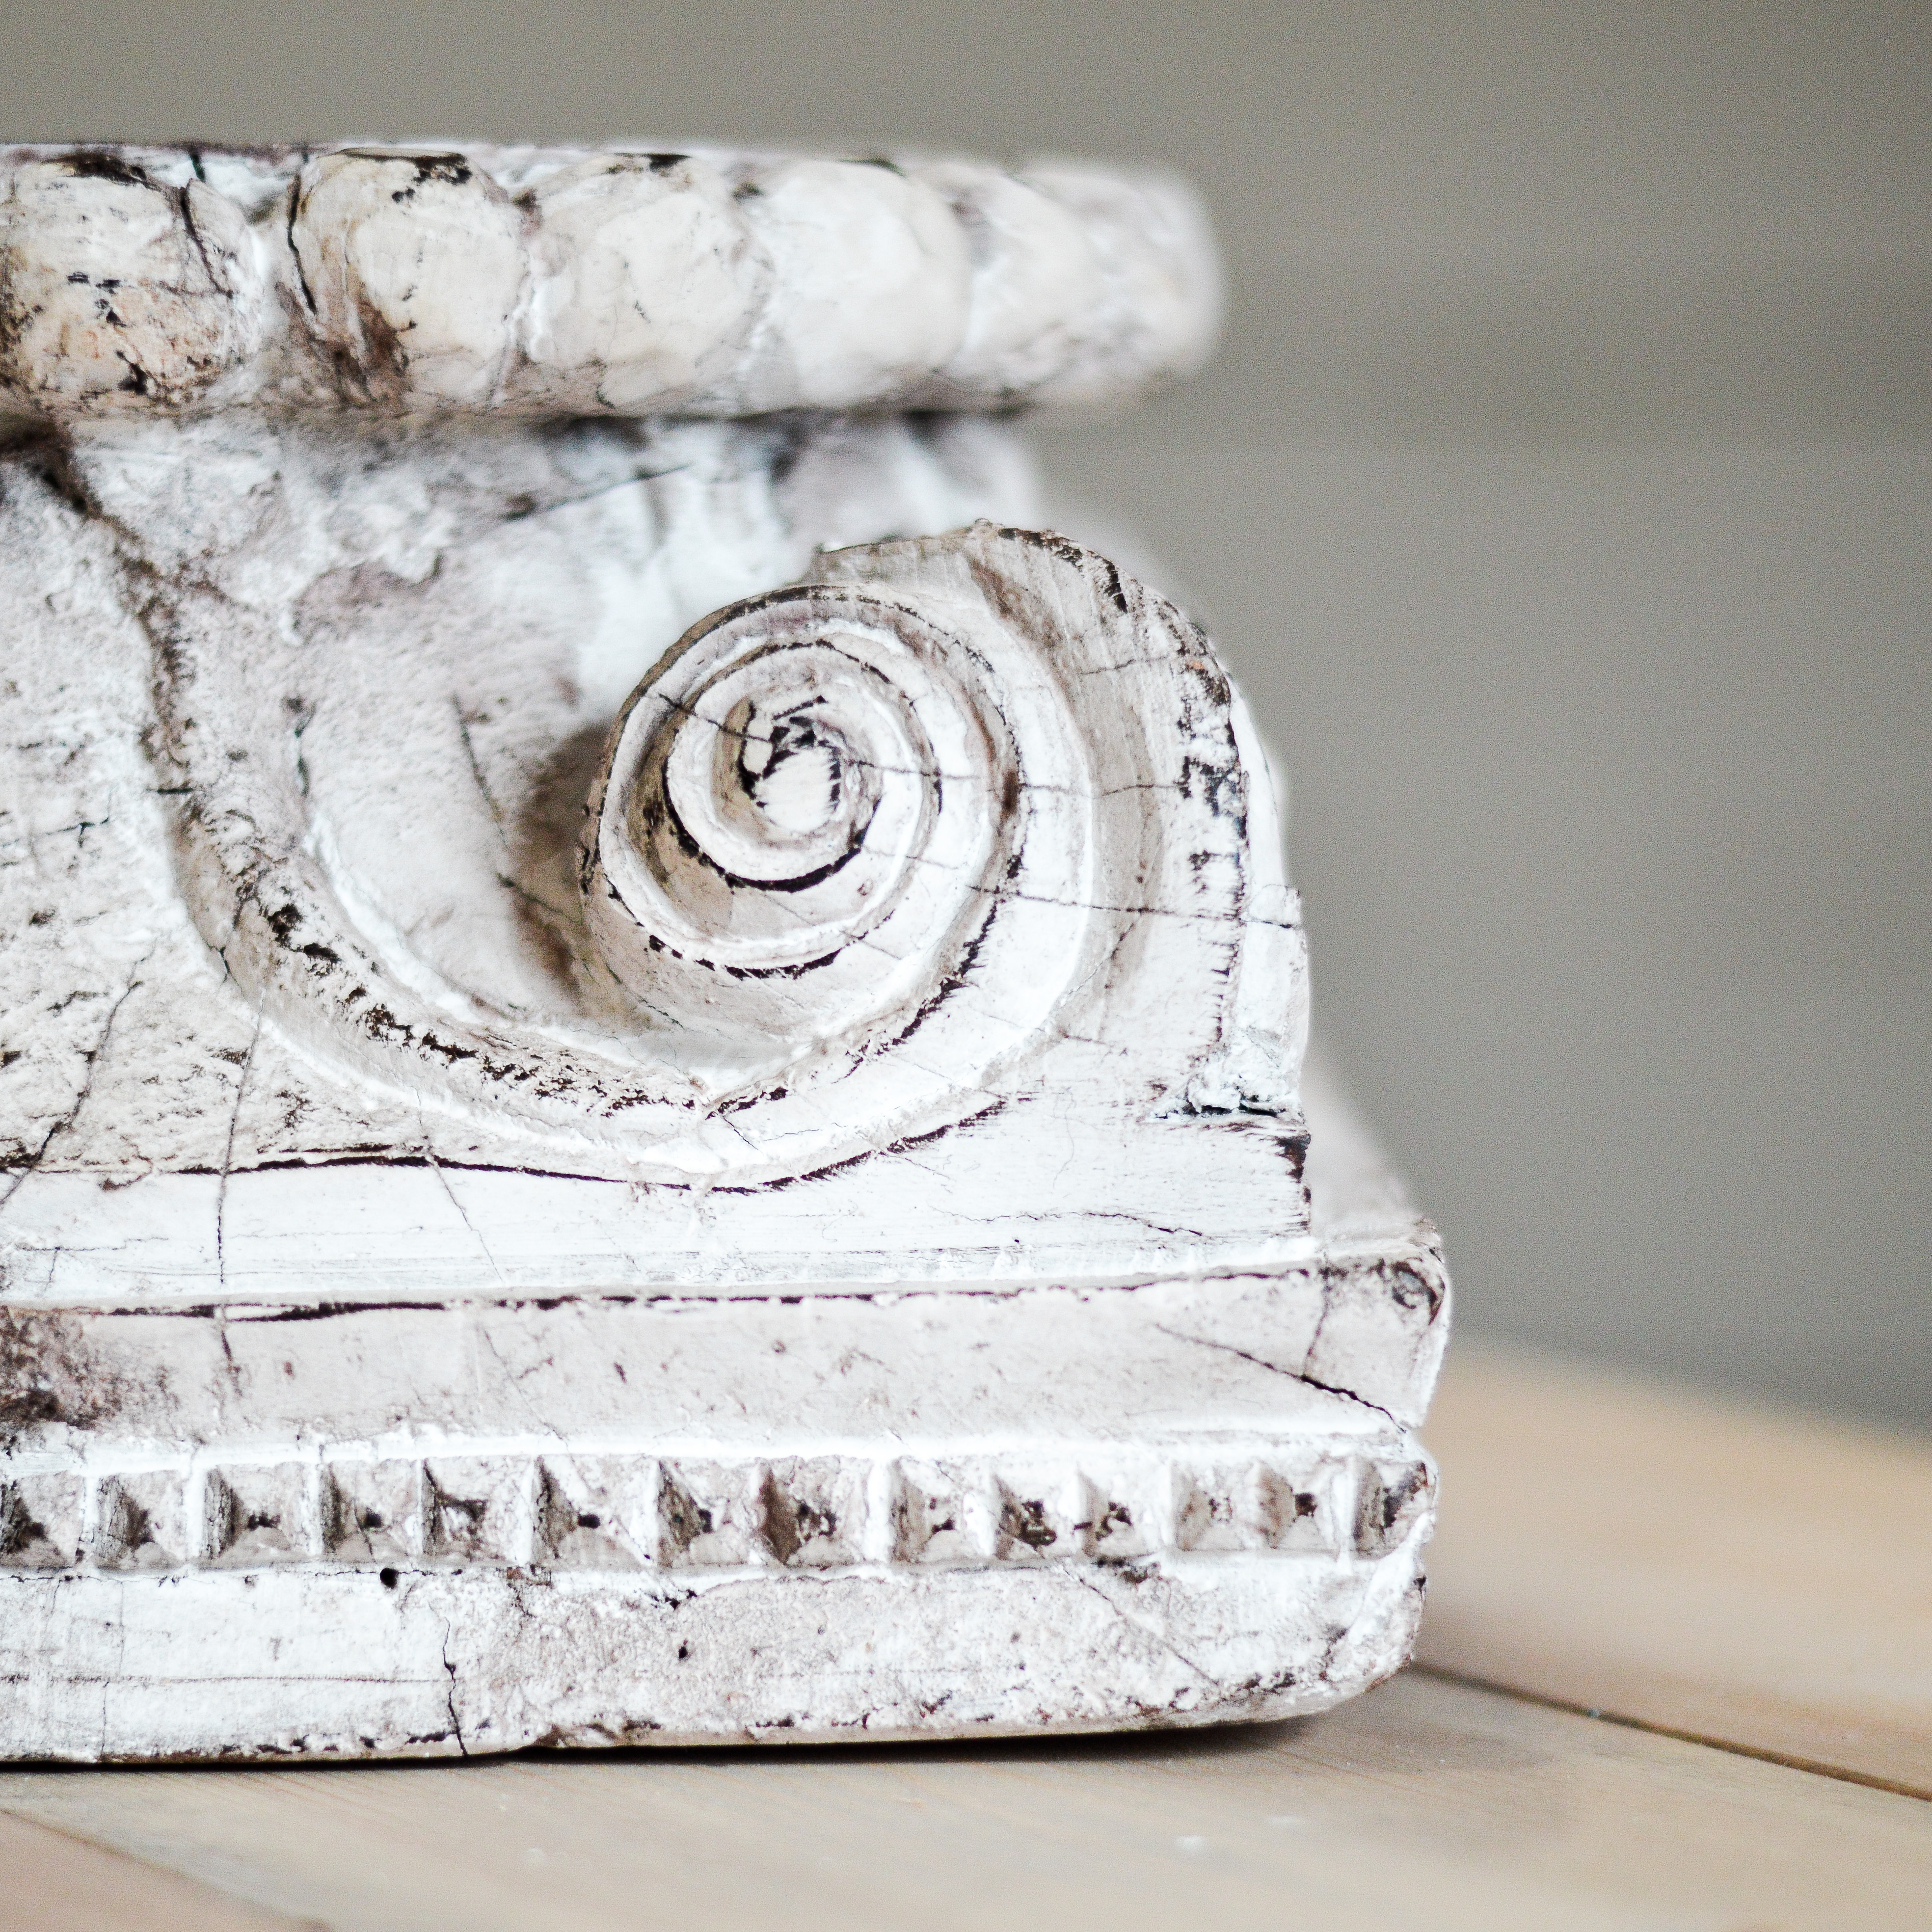
Enter the MOST unique cake stand you could imagine! It’s no doubt a show stopper and would make an incredible centerpiece display at your next party! Or rustic wedding… or farmhouse baby shower… or vintage chic birthday party… you get the idea!


And you’ll be shocked with how easy it is to make!
Here are the supplies you’ll need:
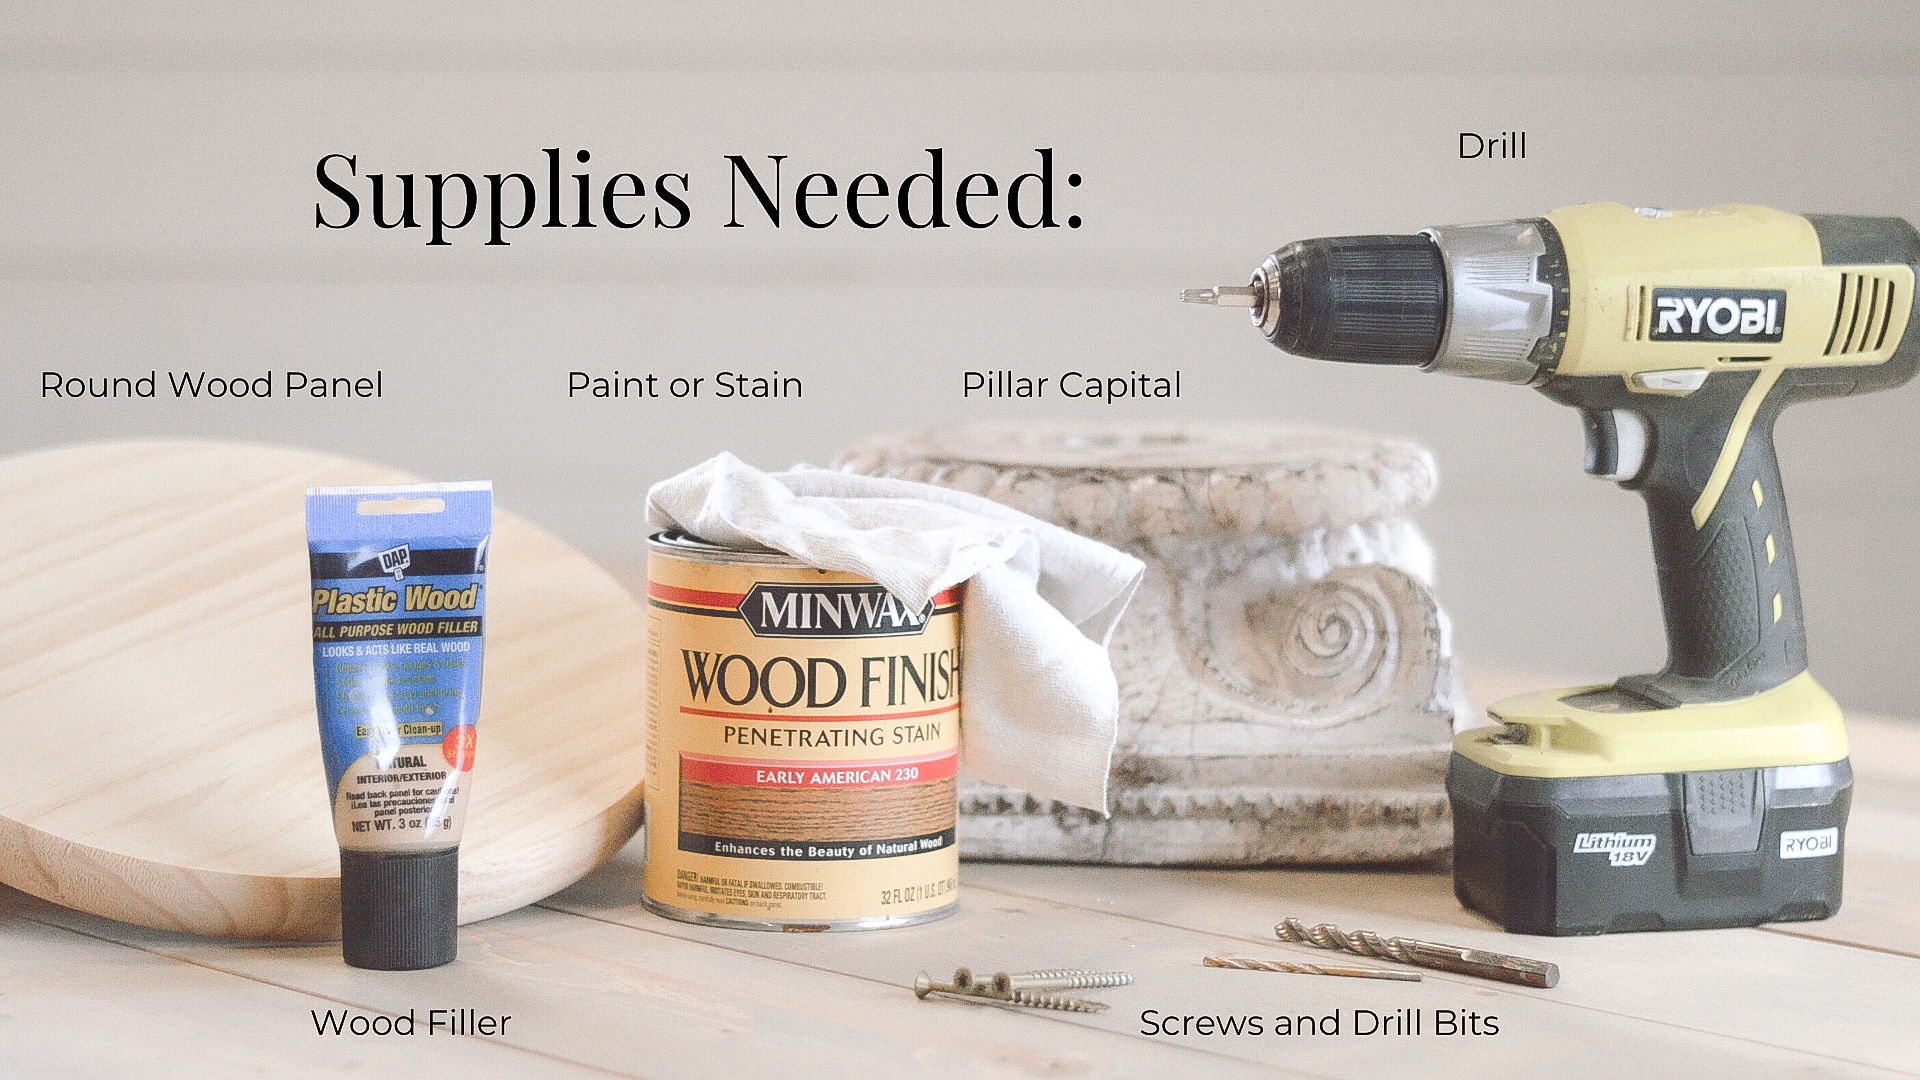
- Salvaged Porch Post Base (also called a pillar capital)
(to find one check out my post HERE where I share the 7 Best Places to Find Architectural Salvage)
- Paint or Stain
- Drill
- Drill Bits
- Screws
- Wood Filler
- Sanding Block

Step 1: Stain the bottom of your wood panel. You can paint or stain your panel. It's completely your preference! But whichever one you decide to do, it's much easier to do it now versus after you attach it to the pillar capital.
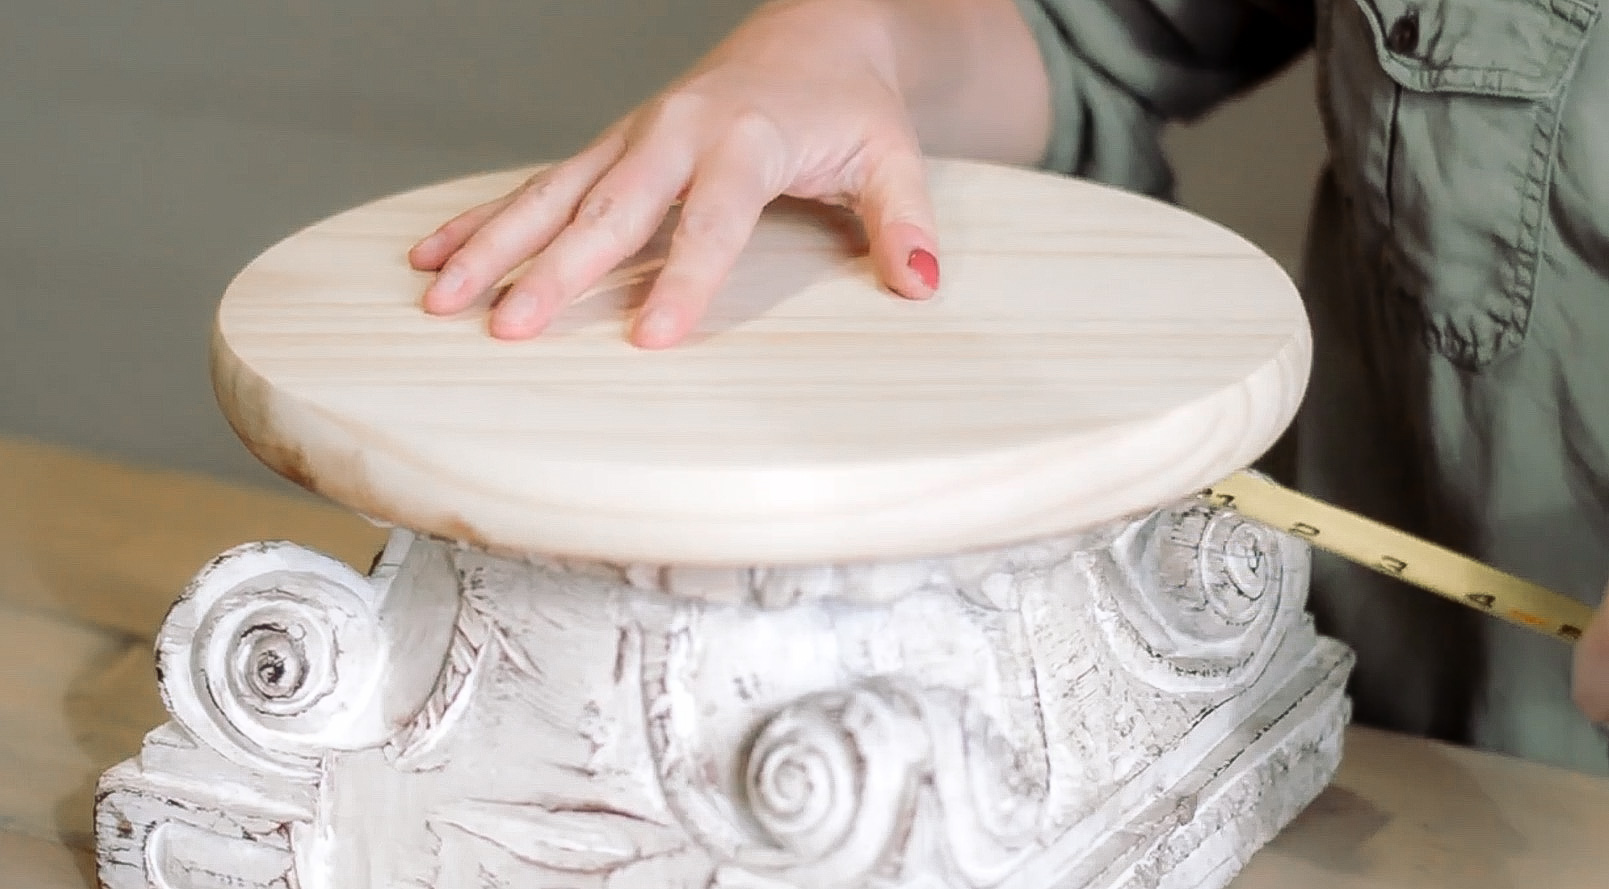
Step 2: Flip the panel over (stained side down on top of the post base). Take your tape measure and measure each side to make sure that it's evenly spaced on top of the base.
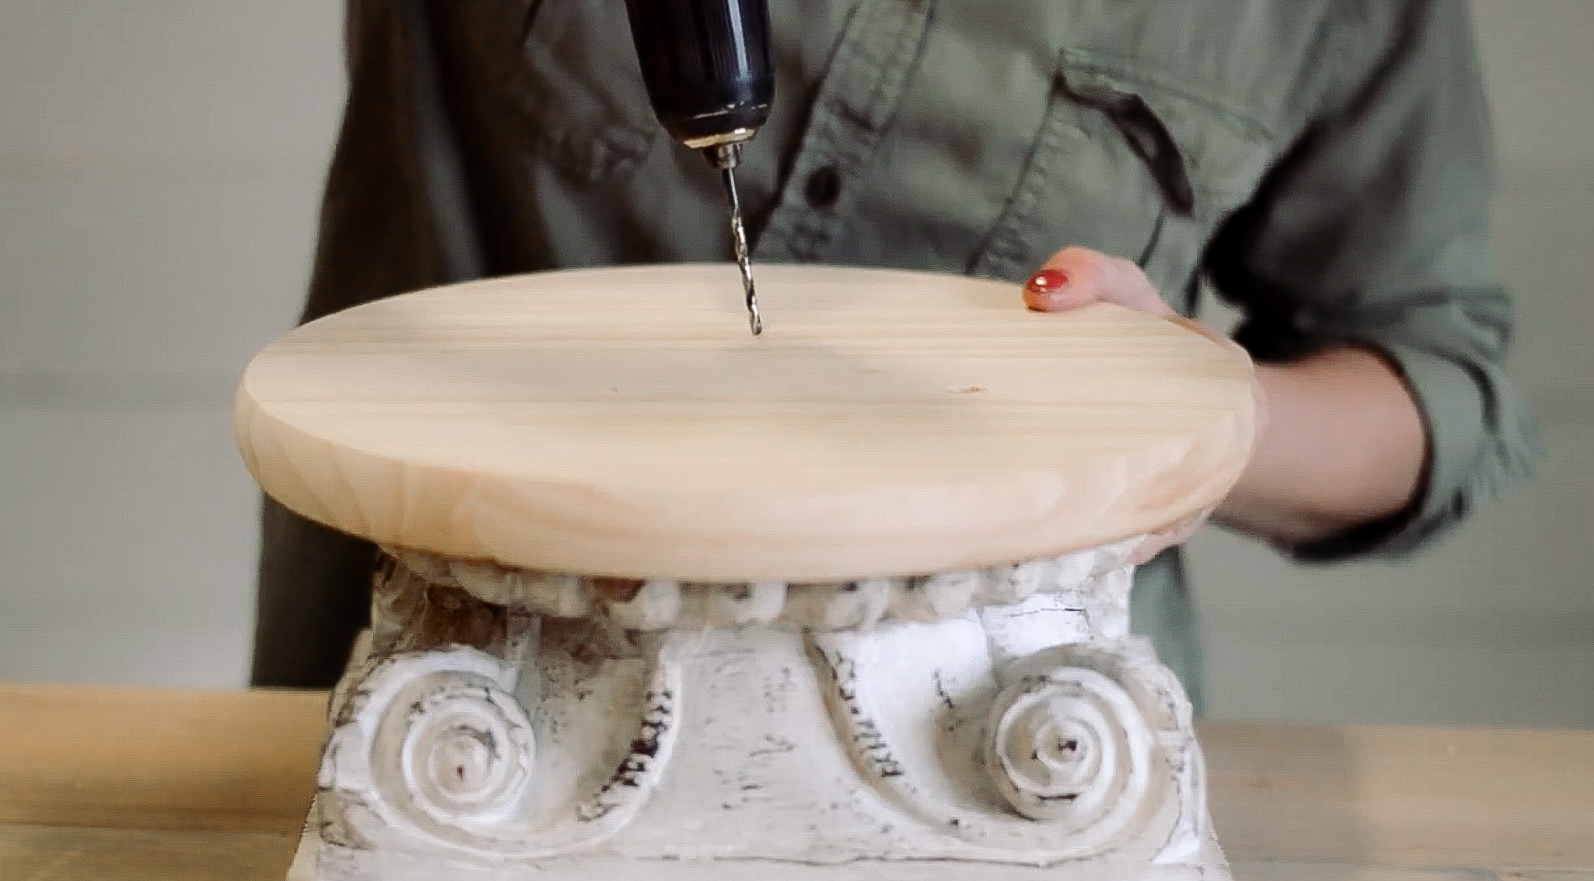
Step 3: Drill your pilot hole where you’ll be attaching the panel to the porch base.* You’ll be drilling through both the panel and the base (about as far down as the length of the screw you’re using). We do this step to prevent the wood from splitting and it makes it easier for us to drive the screw in as well.
*you want to use a drill bit that's slightly smaller than the body of the screw.
If you're new to using a drill you may want to check out my video HERE where I teach you the basics of using a drill- perfect for beginners!
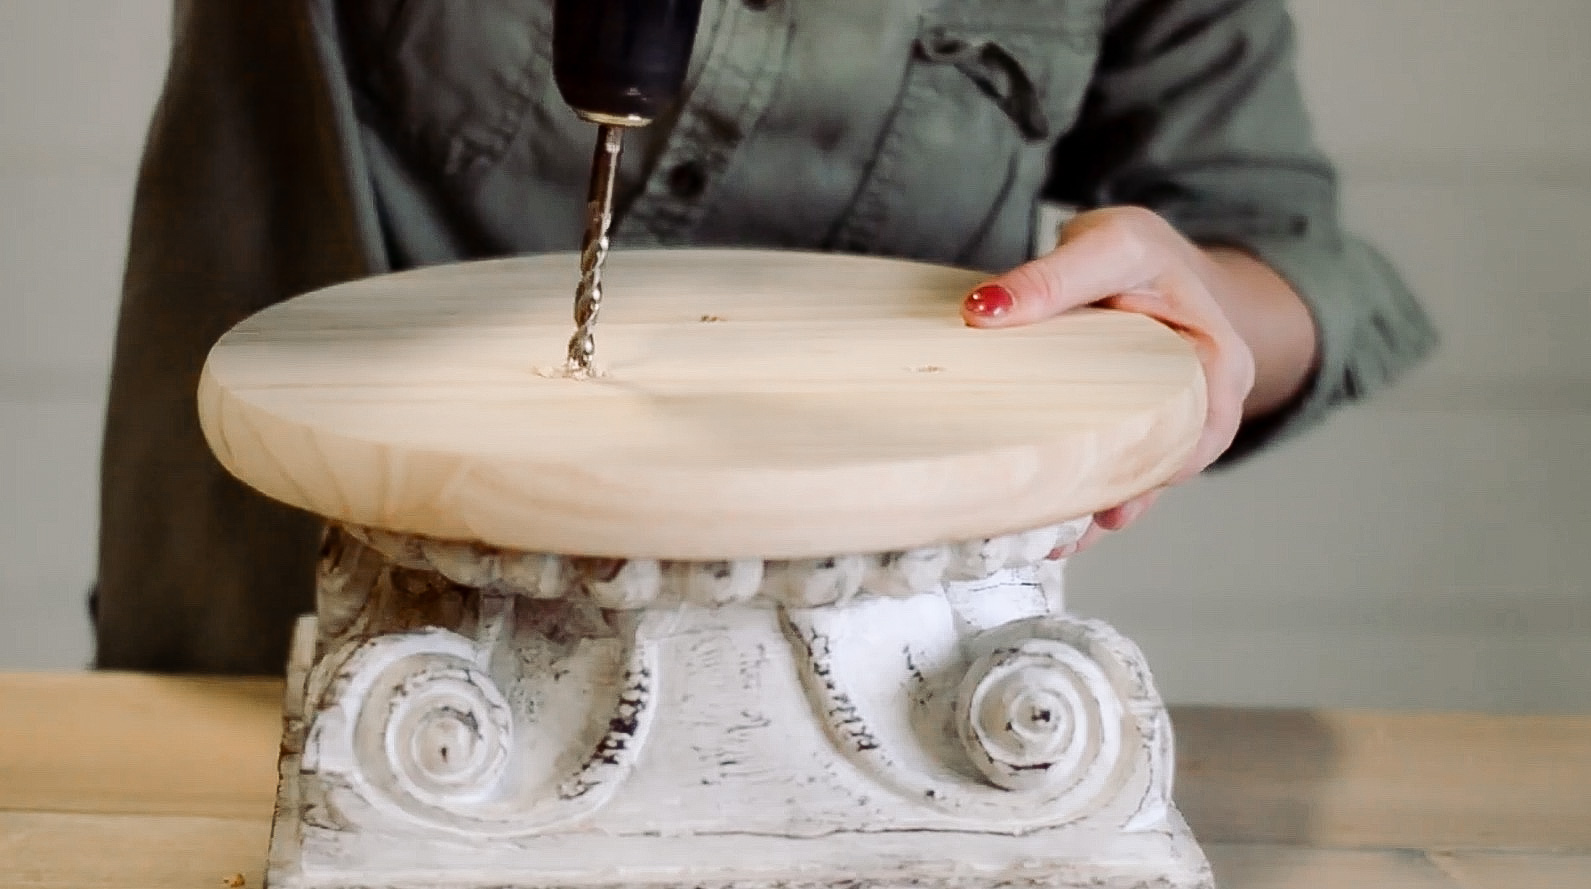
Step 4: Where our pilot holes have been drilled, we're going to use a larger drill bit (the size of the screw head that we're using) and drill a bit down into that wood, about a ¼” inch or so) so then when we drive the screws in, they will be sunk into the wood panel and hidden. That's what's known as countersinking a screw.

Step 5: Time to drive your screws through! Make sure to drive them down into the panel so they’re hidden!
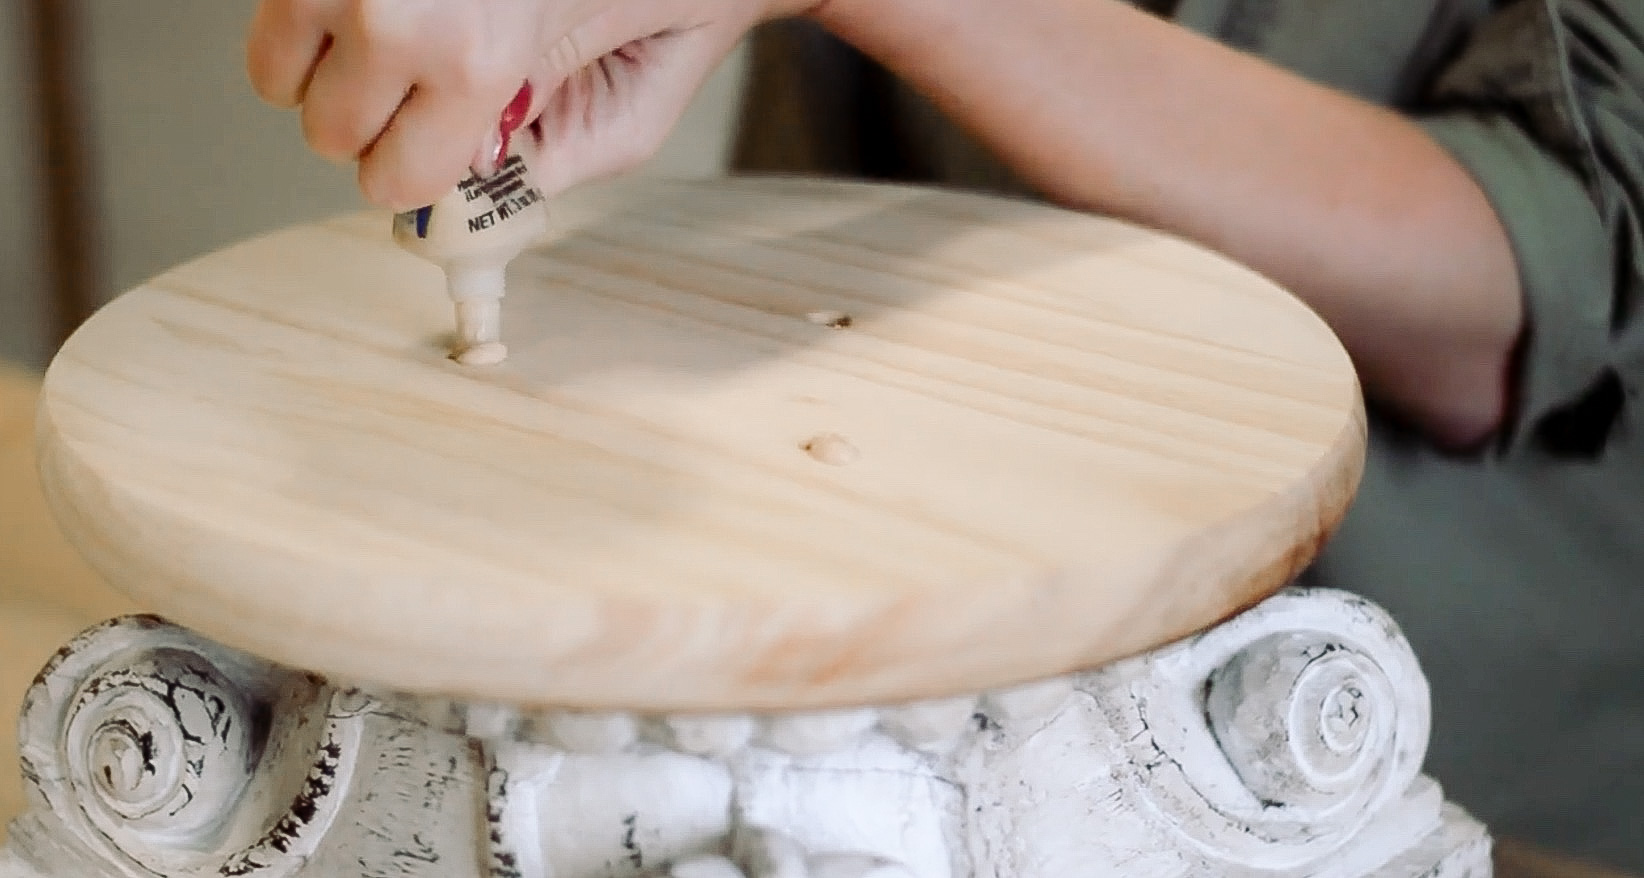
Step 6: Use a wood filler to fill up those holes. If you're painting your panel round, it does not matter what type of wood filler you use, but since I like to stain the top, I made sure that the wood filler I used was a stainable kind. Use a putty knife now to push that wood filler in the holes and scrape the top off, so it's even with the wood.
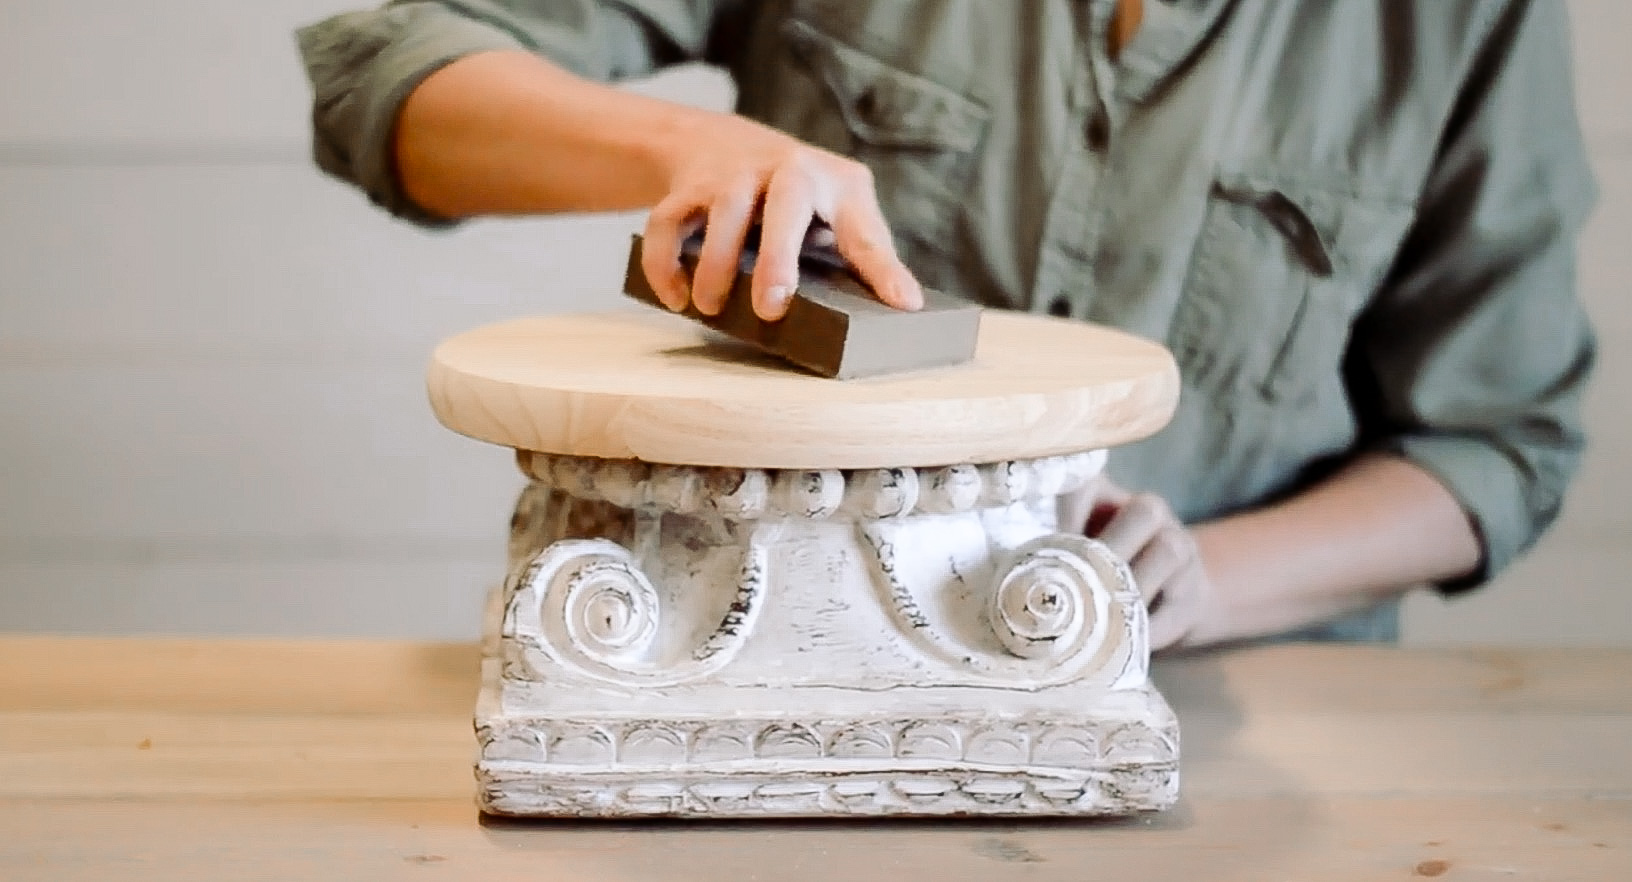
Step 7: Once the wood filler is dry, use a sanding block to sand off the excess on the top to make sure that the top of the cake stand is nice and smooth.
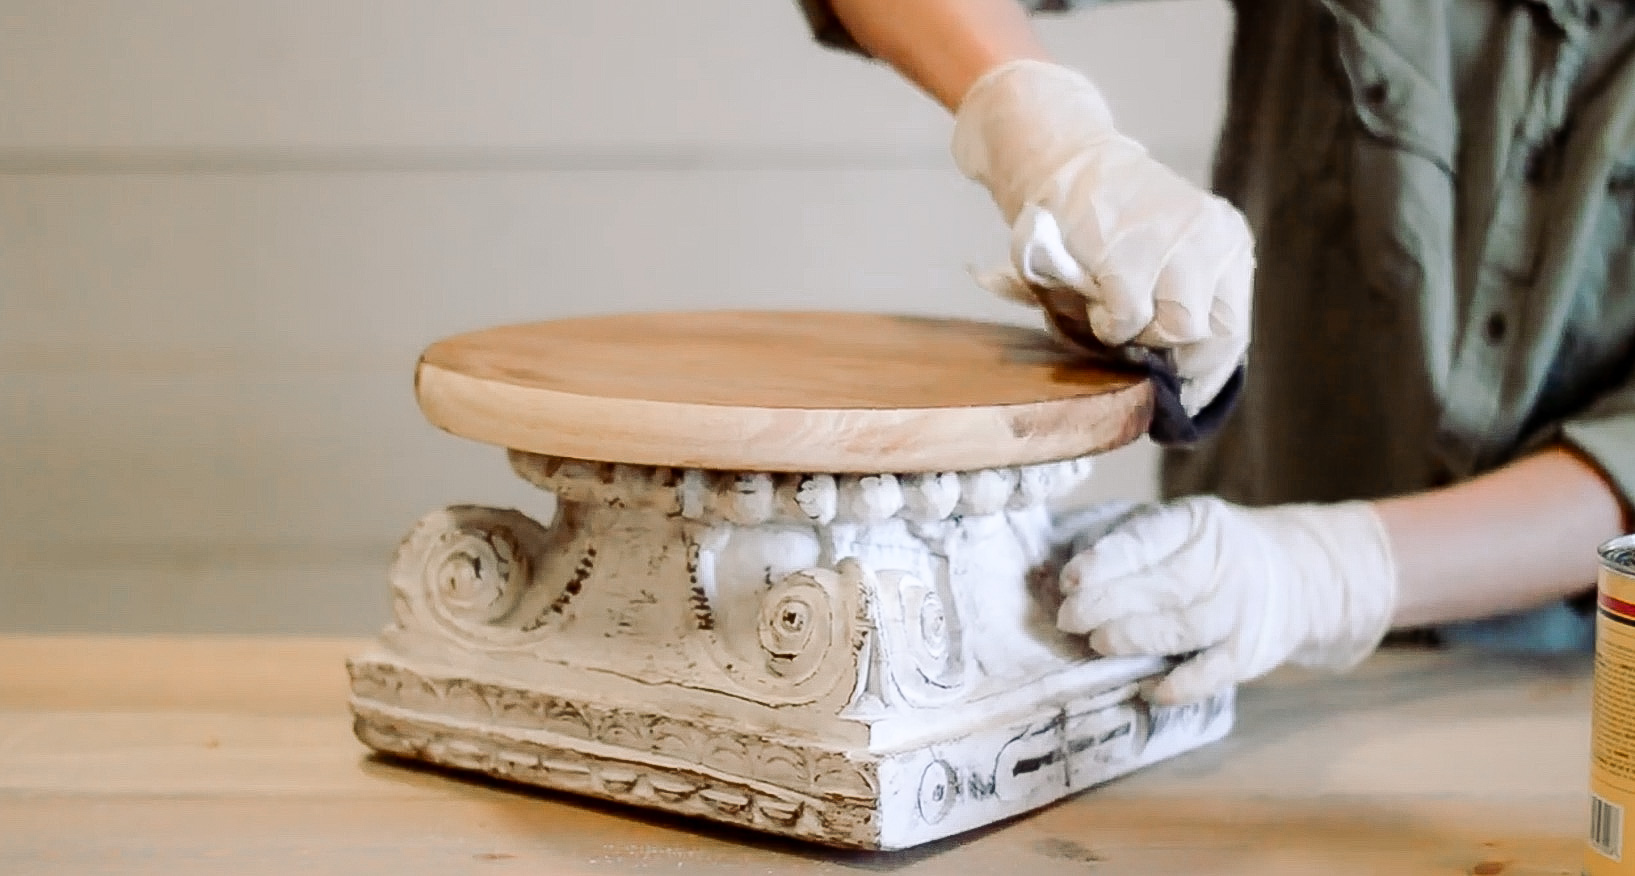
Step 8: The last step is to stain or paint the top of our round. That’s it!
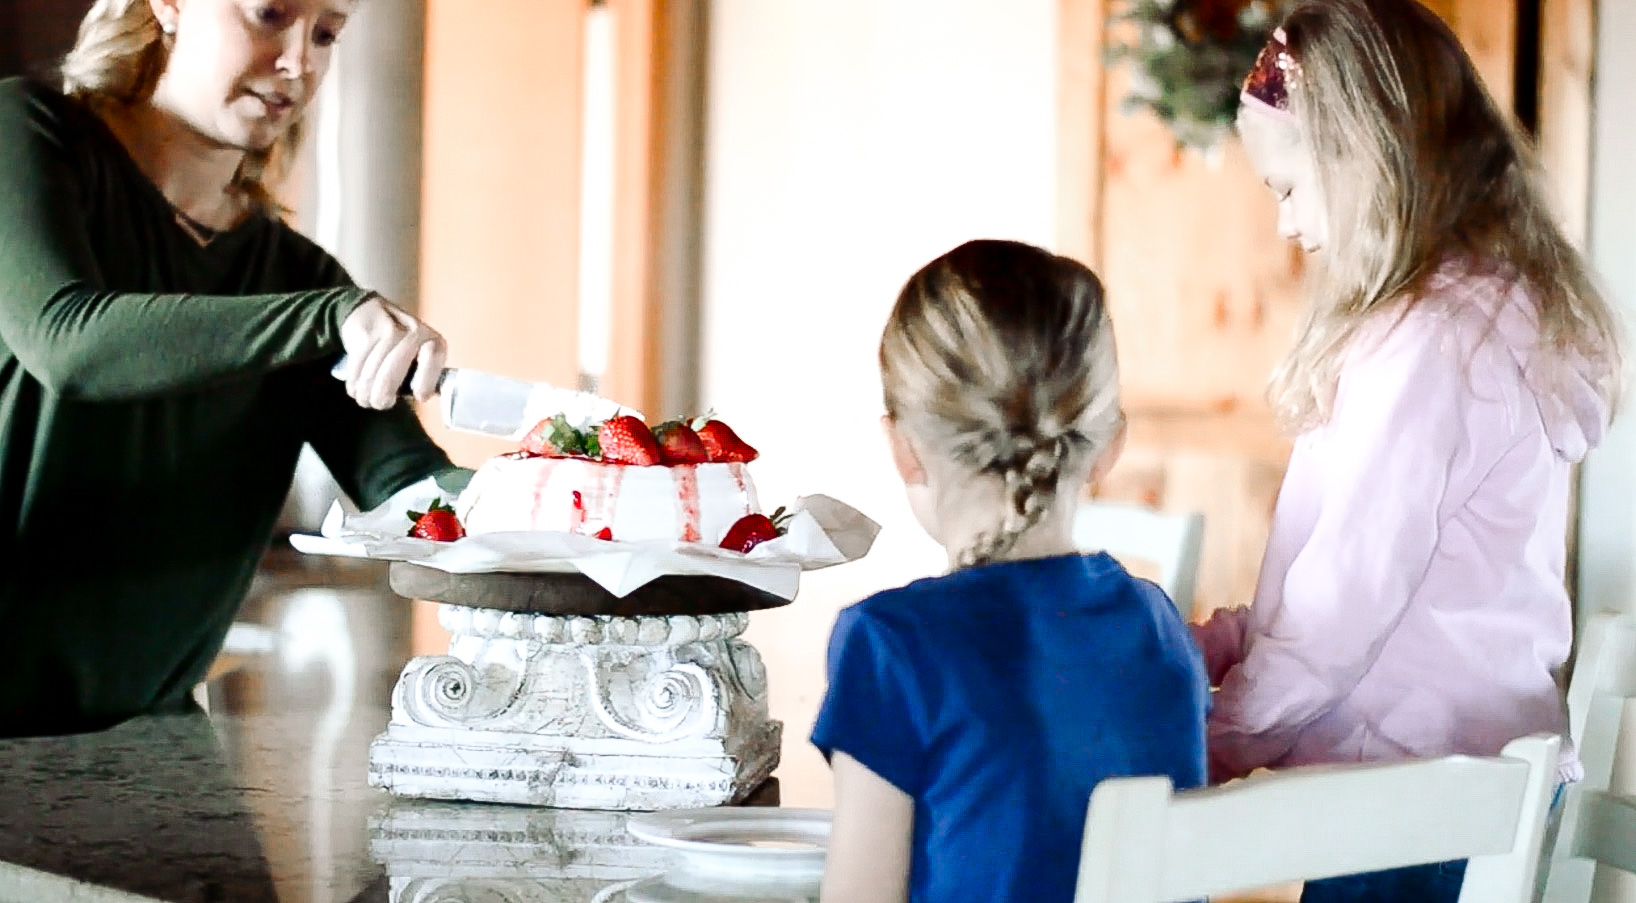
For food safety, make sure to use a piece of parchment paper between the food being served and the cake stand.
It helps to watch the steps in my video at the top of the page. And always feel free to comment if you have any questions because I’m here to help!
Be sure to subscribe to my channel because every week I release new videos on how to build with and use reclaimed materials in your home!


https://casinobulk.com/
https://casinobulk.com/ 카지노사이트
https://casinobulk.com/ 바카라사이트
https://casinobulk.com/ 온라인카지노
https://casinobulk.com/ 온라인바카라
https://casinobulk.com/ 온라인슬롯사이트
https://casinobulk.com/ 카지노사이트게임
https://casinobulk.com/ 카지노사이트검증
https://casinobulk.com/ 카지노사이트추천
https://casinobulk.com/ 안전카지노사이트
https://casinobulk.com/ 안전카지노사이트도메인
https://casinobulk.com/ 안전한 카지노사이트 추천
https://casinobulk.com/ 바카라사이트게임
https://casinobulk.com/ 바카라사이트검증
https://casinobulk.com/ 바카라사이트추천
https://casinobulk.com/ 안전바카라사이트
https://casinobulk.com/ 안전바카라사이트도
https://casinobulk.com/ 안전한 바카라사이트
http://toolbarqueries.google.com.uy/url?sa=t&url=https://casinobulk.com/
http://toolbarqueries.google.com.tw/url?sa=t&url=https://casinobulk.com/
http://toolbarqueries.google.com.tr/url?sa=t&url=https://casinobulk.com/
http://toolbarqueries.google.com.sa/url?sa=t&url=https://casinobulk.com/
http://toolbarqueries.google.com.py/url?sa=t&url=https://casinobulk.com/
http://toolbarqueries.google.com.pr/url?sa=t&url=https://casinobulk.com/
http://toolbarqueries.google.com.pk/url?sa=t&url=https://casinobulk.com/
http://toolbarqueries.google.com.pe/url?sa=t&url=https://casinobulk.com/
http://toolbarqueries.google.com.my/url?sa=t&url=https://casinobulk.com/
http://toolbarqueries.google.com.hk/url?sa=t&url=https://casinobulk.com/
http://toolbarqueries.google.com.gt/url?sa=t&url=https://casinobulk.com/
http://toolbarqueries.google.com.gh/url?sa=t&url=https://casinobulk.com/
https://clients1.google.com.ar/url?sa=t&url=https://casinobulk.com/
https://clients1.google.com.ag/url?sa=t&url=https://casinobulk.com/
https://clients1.google.co.zm/url?sa=t&url=https://casinobulk.com/
https://clients1.google.co.za/url?sa=t&url=https://casinobulk.com/
https://clients1.google.co.ve/url?sa=t&url=https://casinobulk.com/
https://clients1.google.co.uz/url?sa=t&url=https://casinobulk.com/
https://clients1.google.co.ug/url?sa=t&url=https://casinobulk.com/
https://clients1.google.co.th/url?sa=t&url=https://casinobulk.com/
https://clients1.google.co.nz/url?sa=t&url=https://casinobulk.com/
https://clients1.google.co.kr/url?sa=t&url=https://casinobulk.com/
https://clients1.google.co.ke/url?sa=t&url=https://casinobulk.com/
https://clients1.google.co.il/url?sa=t&url=https://casinobulk.com/
https://clients1.google.co.id/url?sa=t&url=https://casinobulk.com/
https://clients1.google.co.cr/url?sa=t&url=https://casinobulk.com/
https://clients1.google.co.ck/url?sa=t&url=https://casinobulk.com/
https://cse.google.co.ck/url?sa=t&url=https://casinobulk.com/
https://cse.google.co.bw/url?sa=t&url=https://casinobulk.com/
https://cse.google.cm/url?sa=t&url=https://casinobulk.com/
https://cse.google.cl/url?sa=t&url=https://casinobulk.com/
https://cse.google.ci/url?sa=t&url=https://casinobulk.com/
https://cse.google.ch/url?sa=t&url=https://casinobulk.com/
https://cse.google.ch/url?sa=i&url=https://casinobulk.com/
https://cse.google.cg/url?sa=t&url=https://casinobulk.com/
https://cse.google.cd/url?sa=t&url=https://casinobulk.com/
https://cse.google.by/url?sa=t&url=https://casinobulk.com/
https://cse.google.bs/url?sa=t&url=https://casinobulk.com/
https://cse.google.bi/url?sa=t&url=https://casinobulk.com/
https://cse.google.bg/url?sa=t&url=https://casinobulk.com/
https://cse.google.be/url?sa=t&url=https://casinobulk.com/
https://cse.google.be/url?sa=i&url=https://casinobulk.com/
https://cse.google.ba/url?sa=t&url=https://casinobulk.com/
https://cse.google.az/url?sa=t&url=https://casinobulk.com/
https://cse.google.at/url?sa=t&url=https://casinobulk.com/
https://images.google.ca/url?sa=t&url=https://blogskorcasino1.blogspot.com/2022/12/connecticut-lead-representative_7.html
https://images.google.by/url?sa=t&url=https://blogskorcasino1.blogspot.com/2022/12/connecticut-lead-representative_7.html
https://images.google.bs/url?sa=t&url=https://blogskorcasino1.blogspot.com/2022/12/connecticut-lead-representative_7.html
https://images.google.bi/url?sa=t&url=https://blogskorcasino1.blogspot.com/2022/12/connecticut-lead-representative_7.html
https://images.google.bg/url?sa=t&url=https://blogskorcasino1.blogspot.com/2022/12/connecticut-lead-representative_7.html
https://images.google.bf/url?sa=t&url=https://blogskorcasino1.blogspot.com/2022/12/connecticut-lead-representative_7.html
https://images.google.be/url?sa=t&url=https://blogskorcasino1.blogspot.com/2022/12/connecticut-lead-representative_7.html
https://images.google.ba/url?sa=t&url=https://blogskorcasino1.blogspot.com/2022/12/connecticut-lead-representative_7.html
https://images.google.ba/url?q=https://blogskorcasino1.blogspot.com/2022/12/connecticut-lead-representative_7.html
https://images.google.az/url?sa=t&url=https://blogskorcasino1.blogspot.com/2022/12/connecticut-lead-representative_7.html
https://images.google.at/url?sa=t&url=https://blogskorcasino1.blogspot.com/2022/12/connecticut-lead-representative_7.html
https://images.google.as/url?sa=t&url=https://blogskorcasino1.blogspot.com/2022/12/connecticut-lead-representative_7.html
https://images.google.am/url?sa=t&url=https://blogskorcasino1.blogspot.com/2022/12/connecticut-lead-representative_7.html
https://images.google.al/url?sa=t&url=https://blogskorcasino1.blogspot.com/2022/12/connecticut-lead-representative_7.html
https://images.google.ae/url?sa=t&url=https://blogskorcasino1.blogspot.com/2022/12/connecticut-lead-representative_7.html
https://images.google.ae/url?q=https://blogskorcasino1.blogspot.com/2022/12/connecticut-lead-representative_7.html
https://images.google.ad/url?sa=t&url=https://blogskorcasino1.blogspot.com/2022/12/connecticut-lead-representative_7.html
https://maps.google.co.ke/url?sa=t&url=https://blogskorcasino1.blogspot.com/2022/12/connecticut-lead-representative_7.html
https://maps.google.co.jp/url?sa=t&url=https://blogskorcasino1.blogspot.com/2022/12/connecticut-lead-representative_7.html
https://maps.google.co.in/url?sa=t&url=https://blogskorcasino1.blogspot.com/2022/12/connecticut-lead-representative_7.html
https://maps.google.co.il/url?sa=t&url=https://blogskorcasino1.blogspot.com/2022/12/connecticut-lead-representative_7.html
https://maps.google.co.id/url?sa=t&url=https://blogskorcasino1.blogspot.com/2022/12/connecticut-lead-representative_7.html
https://maps.google.co.cr/url?sa=t&url=https://blogskorcasino1.blogspot.com/2022/12/connecticut-lead-representative_7.html
https://maps.google.co.bw/url?sa=t&url=https://blogskorcasino1.blogspot.com/2022/12/connecticut-lead-representative_7.html
https://maps.google.cm/url?sa=t&url=https://blogskorcasino1.blogspot.com/2022/12/connecticut-lead-representative_7.html
https://maps.google.cl/url?sa=t&url=https://blogskorcasino1.blogspot.com/2022/12/connecticut-lead-representative_7.html
https://maps.google.ci/url?sa=t&url=https://blogskorcasino1.blogspot.com/2022/12/connecticut-lead-representative_7.html
https://maps.google.ch/url?sa=t&url=https://blogskorcasino1.blogspot.com/2022/12/connecticut-lead-representative_7.html
https://maps.google.cd/url?sa=t&url=https://blogskorcasino1.blogspot.com/2022/12/connecticut-lead-representative_7.html
https://maps.google.cat/url?sa=t&url=https://blogskorcasino1.blogspot.com/2022/12/connecticut-lead-representative_7.html
https://maps.google.ca/url?sa=t&url=https://blogskorcasino1.blogspot.com/2022/12/connecticut-lead-representative_7.html
https://www.google.co.tz/url?sa=t&url=https://blogskorcasino1.blogspot.com/2022/12/connecticut-lead-representative_7.html
https://www.google.co.th/url?sa=t&url=https://blogskorcasino1.blogspot.com/2022/12/connecticut-lead-representative_7.html
https://www.google.co.nz/url?sa=t&url=https://blogskorcasino1.blogspot.com/2022/12/connecticut-lead-representative_7.html
https://www.google.co.ma/url?sa=t&url=https://blogskorcasino1.blogspot.com/2022/12/connecticut-lead-representative_7.html
https://www.google.co.ls/url?sa=t&url=https://blogskorcasino1.blogspot.com/2022/12/connecticut-lead-representative_7.html
https://www.google.co.kr/url?sa=t&url=https://blogskorcasino1.blogspot.com/2022/12/connecticut-lead-representative_7.html
https://www.google.co.ke/url?sa=t&url=https://blogskorcasino1.blogspot.com/2022/12/connecticut-lead-representative_7.html
https://www.google.co.jp/url?sa=t&url=https://blogskorcasino1.blogspot.com/2022/12/connecticut-lead-representative_7.html
https://www.google.co.in/url?sa=t&url=https://blogskorcasino1.blogspot.com/2022/12/connecticut-lead-representative_7.html
https://www.google.co.il/url?sa=t&url=https://blogskorcasino1.blogspot.com/2022/12/connecticut-lead-representative_7.html
https://www.google.co.id/url?sa=t&url=https://blogskorcasino1.blogspot.com/2022/12/connecticut-lead-representative_7.html
https://www.google.co.cr/url?sa=t&url=https://blogskorcasino1.blogspot.com/2022/12/connecticut-lead-representative_7.html
https://www.google.co.bw/url?sa=t&url=https://blogskorcasino1.blogspot.com/2022/12/connecticut-lead-representative_7.html
https://www.google.cm/url?sa=t&url=https://blogskorcasino1.blogspot.com/2022/12/connecticut-lead-representative_7.html
https://www.google.cl/url?sa=t&url=https://blogskorcasino1.blogspot.com/2022/12/connecticut-lead-representative_7.html
https://www.google.ci/url?sa=t&url=https://blogskorcasino1.blogspot.com/2022/12/connecticut-lead-representative_7.html
https://www.google.ch/url?sa=t&url=https://blogskorcasino1.blogspot.com/2022/12/connecticut-lead-representative_7.html
https://www.google.cd/url?sa=t&url=https://blogskorcasino1.blogspot.com/2022/12/connecticut-lead-representative_7.html
https://www.google.cat/url?sa=t&url=https://blogskorcasino1.blogspot.com/2022/12/connecticut-lead-representative_7.html
https://www.google.ca/url?sa=t&url=https://blogskorcasino1.blogspot.com/2022/12/connecticut-lead-representative_7.html
https://casinobulk.com/
https://casinobulk.com/ 카지노사이트
https://casinobulk.com/ 바카라사이트
https://casinobulk.com/ 온라인카지노
https://casinobulk.com/ 온라인바카라
https://casinobulk.com/ 온라인슬롯사이트
https://casinobulk.com/ 카지노사이트게임
https://casinobulk.com/ 카지노사이트검증
https://casinobulk.com/ 카지노사이트추천
https://casinobulk.com/ 안전카지노사이트
https://casinobulk.com/ 안전카지노사이트도메인
https://casinobulk.com/ 안전한 카지노사이트 추천
https://casinobulk.com/ 바카라사이트게임
https://casinobulk.com/ 바카라사이트검증
https://casinobulk.com/ 바카라사이트추천
https://casinobulk.com/ 안전바카라사이트
https://casinobulk.com/ 안전바카라사이트도
https://casinobulk.com/ 안전한 바카라사이트
http://toolbarqueries.google.com.uy/url?sa=t&url=https://casinobulk.com/
http://toolbarqueries.google.com.tw/url?sa=t&url=https://casinobulk.com/
http://toolbarqueries.google.com.tr/url?sa=t&url=https://casinobulk.com/
http://toolbarqueries.google.com.sa/url?sa=t&url=https://casinobulk.com/
http://toolbarqueries.google.com.py/url?sa=t&url=https://casinobulk.com/
http://toolbarqueries.google.com.pr/url?sa=t&url=https://casinobulk.com/
http://toolbarqueries.google.com.pk/url?sa=t&url=https://casinobulk.com/
http://toolbarqueries.google.com.pe/url?sa=t&url=https://casinobulk.com/
http://toolbarqueries.google.com.my/url?sa=t&url=https://casinobulk.com/
http://toolbarqueries.google.com.hk/url?sa=t&url=https://casinobulk.com/
http://toolbarqueries.google.com.gt/url?sa=t&url=https://casinobulk.com/
http://toolbarqueries.google.com.gh/url?sa=t&url=https://casinobulk.com/
https://clients1.google.com.ar/url?sa=t&url=https://casinobulk.com/
https://clients1.google.com.ag/url?sa=t&url=https://casinobulk.com/
https://clients1.google.co.zm/url?sa=t&url=https://casinobulk.com/
https://clients1.google.co.za/url?sa=t&url=https://casinobulk.com/
https://clients1.google.co.ve/url?sa=t&url=https://casinobulk.com/
https://clients1.google.co.uz/url?sa=t&url=https://casinobulk.com/
https://clients1.google.co.ug/url?sa=t&url=https://casinobulk.com/
https://clients1.google.co.th/url?sa=t&url=https://casinobulk.com/
https://clients1.google.co.nz/url?sa=t&url=https://casinobulk.com/
https://clients1.google.co.kr/url?sa=t&url=https://casinobulk.com/
https://clients1.google.co.ke/url?sa=t&url=https://casinobulk.com/
https://clients1.google.co.il/url?sa=t&url=https://casinobulk.com/
https://clients1.google.co.id/url?sa=t&url=https://casinobulk.com/
https://clients1.google.co.cr/url?sa=t&url=https://casinobulk.com/
https://clients1.google.co.ck/url?sa=t&url=https://casinobulk.com/
https://cse.google.co.ck/url?sa=t&url=https://casinobulk.com/
https://cse.google.co.bw/url?sa=t&url=https://casinobulk.com/
https://cse.google.cm/url?sa=t&url=https://casinobulk.com/
https://cse.google.cl/url?sa=t&url=https://casinobulk.com/
https://cse.google.ci/url?sa=t&url=https://casinobulk.com/
https://cse.google.ch/url?sa=t&url=https://casinobulk.com/
https://cse.google.ch/url?sa=i&url=https://casinobulk.com/
https://cse.google.cg/url?sa=t&url=https://casinobulk.com/
https://cse.google.cd/url?sa=t&url=https://casinobulk.com/
https://cse.google.by/url?sa=t&url=https://casinobulk.com/
https://cse.google.bs/url?sa=t&url=https://casinobulk.com/
https://cse.google.bi/url?sa=t&url=https://casinobulk.com/
https://cse.google.bg/url?sa=t&url=https://casinobulk.com/
https://cse.google.be/url?sa=t&url=https://casinobulk.com/
https://cse.google.be/url?sa=i&url=https://casinobulk.com/
https://cse.google.ba/url?sa=t&url=https://casinobulk.com/
https://cse.google.az/url?sa=t&url=https://casinobulk.com/
https://cse.google.at/url?sa=t&url=https://casinobulk.com/
https://images.google.ca/url?sa=t&url=https://blogskorcasino1.blogspot.com/2022/11/6-of-most-terrible-club-rounds-ever.html
https://images.google.by/url?sa=t&url=https://blogskorcasino1.blogspot.com/2022/11/6-of-most-terrible-club-rounds-ever.html
https://images.google.bs/url?sa=t&url=https://blogskorcasino1.blogspot.com/2022/11/6-of-most-terrible-club-rounds-ever.html
https://images.google.bi/url?sa=t&url=https://blogskorcasino1.blogspot.com/2022/11/6-of-most-terrible-club-rounds-ever.html
https://images.google.bg/url?sa=t&url=https://blogskorcasino1.blogspot.com/2022/11/6-of-most-terrible-club-rounds-ever.html
https://images.google.bf/url?sa=t&url=https://blogskorcasino1.blogspot.com/2022/11/6-of-most-terrible-club-rounds-ever.html
https://images.google.be/url?sa=t&url=https://blogskorcasino1.blogspot.com/2022/11/6-of-most-terrible-club-rounds-ever.html
https://images.google.ba/url?sa=t&url=https://blogskorcasino1.blogspot.com/2022/11/6-of-most-terrible-club-rounds-ever.html
https://images.google.ba/url?q=https://blogskorcasino1.blogspot.com/2022/11/6-of-most-terrible-club-rounds-ever.html
https://images.google.az/url?sa=t&url=https://blogskorcasino1.blogspot.com/2022/11/6-of-most-terrible-club-rounds-ever.html
https://images.google.at/url?sa=t&url=https://blogskorcasino1.blogspot.com/2022/11/6-of-most-terrible-club-rounds-ever.html
https://images.google.as/url?sa=t&url=https://blogskorcasino1.blogspot.com/2022/11/6-of-most-terrible-club-rounds-ever.html
https://images.google.am/url?sa=t&url=https://blogskorcasino1.blogspot.com/2022/11/6-of-most-terrible-club-rounds-ever.html
https://images.google.al/url?sa=t&url=https://blogskorcasino1.blogspot.com/2022/11/6-of-most-terrible-club-rounds-ever.html
https://images.google.ae/url?sa=t&url=https://blogskorcasino1.blogspot.com/2022/11/6-of-most-terrible-club-rounds-ever.html
https://images.google.ae/url?q=https://blogskorcasino1.blogspot.com/2022/11/6-of-most-terrible-club-rounds-ever.html
https://images.google.ad/url?sa=t&url=https://blogskorcasino1.blogspot.com/2022/11/6-of-most-terrible-club-rounds-ever.html
https://maps.google.co.ke/url?sa=t&url=https://blogskorcasino1.blogspot.com/2022/11/6-of-most-terrible-club-rounds-ever.html
https://maps.google.co.jp/url?sa=t&url=https://blogskorcasino1.blogspot.com/2022/11/6-of-most-terrible-club-rounds-ever.html
https://maps.google.co.in/url?sa=t&url=https://blogskorcasino1.blogspot.com/2022/11/6-of-most-terrible-club-rounds-ever.html
https://maps.google.co.il/url?sa=t&url=https://blogskorcasino1.blogspot.com/2022/11/6-of-most-terrible-club-rounds-ever.html
https://maps.google.co.id/url?sa=t&url=https://blogskorcasino1.blogspot.com/2022/11/6-of-most-terrible-club-rounds-ever.html
https://maps.google.co.cr/url?sa=t&url=https://blogskorcasino1.blogspot.com/2022/11/6-of-most-terrible-club-rounds-ever.html
https://maps.google.co.bw/url?sa=t&url=https://blogskorcasino1.blogspot.com/2022/11/6-of-most-terrible-club-rounds-ever.html
https://maps.google.cm/url?sa=t&url=https://blogskorcasino1.blogspot.com/2022/11/6-of-most-terrible-club-rounds-ever.html
https://maps.google.cl/url?sa=t&url=https://blogskorcasino1.blogspot.com/2022/11/6-of-most-terrible-club-rounds-ever.html
https://maps.google.ci/url?sa=t&url=https://blogskorcasino1.blogspot.com/2022/11/6-of-most-terrible-club-rounds-ever.html
https://maps.google.ch/url?sa=t&url=https://blogskorcasino1.blogspot.com/2022/11/6-of-most-terrible-club-rounds-ever.html
https://maps.google.cd/url?sa=t&url=https://blogskorcasino1.blogspot.com/2022/11/6-of-most-terrible-club-rounds-ever.html
https://maps.google.cat/url?sa=t&url=https://blogskorcasino1.blogspot.com/2022/11/6-of-most-terrible-club-rounds-ever.html
https://maps.google.ca/url?sa=t&url=https://blogskorcasino1.blogspot.com/2022/11/6-of-most-terrible-club-rounds-ever.html
https://www.google.co.tz/url?sa=t&url=https://blogskorcasino1.blogspot.com/2022/11/6-of-most-terrible-club-rounds-ever.html
https://www.google.co.th/url?sa=t&url=https://blogskorcasino1.blogspot.com/2022/11/6-of-most-terrible-club-rounds-ever.html
https://www.google.co.nz/url?sa=t&url=https://blogskorcasino1.blogspot.com/2022/11/6-of-most-terrible-club-rounds-ever.html
https://www.google.co.ma/url?sa=t&url=https://blogskorcasino1.blogspot.com/2022/11/6-of-most-terrible-club-rounds-ever.html
https://www.google.co.ls/url?sa=t&url=https://blogskorcasino1.blogspot.com/2022/11/6-of-most-terrible-club-rounds-ever.html
https://www.google.co.kr/url?sa=t&url=https://blogskorcasino1.blogspot.com/2022/11/6-of-most-terrible-club-rounds-ever.html
https://www.google.co.ke/url?sa=t&url=https://blogskorcasino1.blogspot.com/2022/11/6-of-most-terrible-club-rounds-ever.html
https://www.google.co.jp/url?sa=t&url=https://blogskorcasino1.blogspot.com/2022/11/6-of-most-terrible-club-rounds-ever.html
https://www.google.co.in/url?sa=t&url=https://blogskorcasino1.blogspot.com/2022/11/6-of-most-terrible-club-rounds-ever.html
https://www.google.co.il/url?sa=t&url=https://blogskorcasino1.blogspot.com/2022/11/6-of-most-terrible-club-rounds-ever.html
https://www.google.co.id/url?sa=t&url=https://blogskorcasino1.blogspot.com/2022/11/6-of-most-terrible-club-rounds-ever.html
https://www.google.co.cr/url?sa=t&url=https://blogskorcasino1.blogspot.com/2022/11/6-of-most-terrible-club-rounds-ever.html
https://www.google.co.bw/url?sa=t&url=https://blogskorcasino1.blogspot.com/2022/11/6-of-most-terrible-club-rounds-ever.html
https://www.google.cm/url?sa=t&url=https://blogskorcasino1.blogspot.com/2022/11/6-of-most-terrible-club-rounds-ever.html
https://www.google.cl/url?sa=t&url=https://blogskorcasino1.blogspot.com/2022/11/6-of-most-terrible-club-rounds-ever.html
https://www.google.ci/url?sa=t&url=https://blogskorcasino1.blogspot.com/2022/11/6-of-most-terrible-club-rounds-ever.html
https://www.google.ch/url?sa=t&url=https://blogskorcasino1.blogspot.com/2022/11/6-of-most-terrible-club-rounds-ever.html
https://www.google.cd/url?sa=t&url=https://blogskorcasino1.blogspot.com/2022/11/6-of-most-terrible-club-rounds-ever.html
https://www.google.cat/url?sa=t&url=https://blogskorcasino1.blogspot.com/2022/11/6-of-most-terrible-club-rounds-ever.html
https://www.google.ca/url?sa=t&url=https://blogskorcasino1.blogspot.com/2022/11/6-of-most-terrible-club-rounds-ever.html
11/18/22
blairebble@gmail.com
https://sportstoto7.com/
안전 스포츠사이트 추천
카지노사이트 https://sportstoto7.com/
바카라사이트 https://sportstoto7.com/
온라인카지노 https://sportstoto7.com/
온라인바카라 https://sportstoto7.com/
온라인슬롯사이트 https://sportstoto7.com/
카지노사이트게임 https://sportstoto7.com/
카지노사이트검증 https://sportstoto7.com/
카지노사이트추천 https://sportstoto7.com/
안전카지노사이트 https://sportstoto7.com/
안전카지노사이트도메인 https://sportstoto7.com/
http://www.erotikplatz.at/redirect.php?id=939&mode=fuhrer&url=https://sportstoto7.com/
http://www.imsnet.at/LangChange.aspx?uri=https://sportstoto7.com/
https://www.kath-kirche-kaernten.at/pfarren/pfarre/C3014?URL=https://sportstoto7.com/
http://gs.matzendorf.at/includes/linkaufruf.asp?art=kapitel&link=https://sportstoto7.com/
http://www.nuttenzone.at/jump.php?url=https://sportstoto7.com/
https://cms.oeav-events.at/wGlobal/nessyEDVapps/layout/fancybox.php?link=https://sportstoto7.com
https://www.oebb.at/nightjet_newsletter/tc/xxxx?url=https://sportstoto7.com/
https://ramset.com.au/document/url/?url=https://sportstoto7.com/
http://rubyconnection.com.au/umbraco/newsletterstudio/tracking/trackclick.aspx?
http://southburnett.com.au/movies/movie.php?url=https://sportstoto7.com/
https://www.vicsport.com.au/analytics/outbound?url=https://sportstoto7.com/
https://www.vwwatercooled.com.au/forums/redirect-to/?redirect=https://https://sportstoto7.com/
http://clients3.weblink.com.au/clients/aluminalimited/priceframe1.aspx?link=https://sportstoto7.com/
http://fedorasrv.com/link3/link3.cgi?mode=cnt&hp=https://sportstoto7.com/
http://www.rss.geodles.com/fwd.php?url=https://sportstoto7.com/
http://imperialoptical.com/news-redirect.aspx?url=https://sportstoto7.com/
http://floridafilmofficeinc.com/?goto=https://sportsbettingooo13.blogspot.com/2022/11/nice-versus-fc-koln-forecast-and.html
https://www.freemusic123.com/karaoke/cgi-bin/out.cgi?id=castillo&url=https://sportsbettingooo13.blogspot.com/2022/11/nice-versus-fc-koln-forecast-and.html
http://www.glorioustronics.com/redirect.php?link=https://sportsbettingooo13.blogspot.com/2022/11/nice-versus-fc-koln-forecast-and.htmlhp_id=1242&url=https://sportsbettingooo13.blogspot.com/2022/11/nice-versus-fc-koln-forecast-and.html
http://www.islulu.com/link.php?url=https://sportsbettingooo13.blogspot.com/2022/11/nice-versus-fc-koln-forecast-and.html
http://www.johnvorhees.com/gbook/go.php?url=https://sportsbettingooo13.blogspot.com/2022/11/nice-versus-fc-koln-forecast-and.html
http://www.kanazawa-navi.com/navi/rank.cgi?mode=link&id=700&url=https://sportsbettingooo13.blogspot.com/2022/11/nice-versus-fc-koln-forecast-and.html
https://www.kushima.com/cgi-bin/kikusui/link.cgi?d=https://sportsbettingooo13.blogspot.com/2022/11/nice-versus-fc-koln-forecast-and.html
http://lilnymph.com/out.php?https://sportsbettingooo13.blogspot.com/2022/11/nice-versus-fc-koln-forecast-and.html
http://www.lissakay.com/institches/index.php?URL=https://sportsbettingooo13.blogspot.com/2022/11/nice-versus-fc-koln-forecast-and.html
http://www.listenyuan.com/home/link.php?url=https://sportsbettingooo13.blogspot.com/2022/11/nice-versus-fc-koln-forecast-and.html
https://www.mauihealthguide.com/ads/adclick.php?bannerid=25&zoneid=16&source=&dest=https://sportsbettingooo13.blogspot.com/2022/11/nice-versus-fc-koln-forecast-and.html
http://www.mistress-and-slave.com/cgi-bin/out.cgi?id=123crush&url=https://sportsbettingooo13.blogspot.com/2022/11/nice-versus-fc-koln-forecast-and.html
http://www.momshere.com/cgi-bin/atx/out.cgi?id=212&tag=top12&trade=https://sportsbettingooo13.blogspot.com/2022/11/nice-versus-fc-koln-forecast-and.html
http://www.myhottiewife.com/cgi-bin/arpro/out.cgi?id=Jojo&url=https://sportsbettingooo13.blogspot.com/2022/11/nice-versus-fc-koln-forecast-and.html
https://app.newsatme.com/emt/ses/814/33cfb749dac0cb4d05f2f1c78d3486607231be54/click?url=https://sportsbettingooo13.blogspot.com/2022/11/nice-versus-fc-koln-forecast-and.html
http://www.omatgp.com/cgi-bin/atc/out.cgi?id=17&u=https://sportsbettingooo13.blogspot.com/2022/11/nice-versus-fc-koln-forecast-and.html
http://www.orth-haus.com/peters_empfehlungen/jump.php?site=https://sportsbettingooo13.blogspot.com/2022/11/nice-versus-fc-koln-forecast-and.html
http://www.sermemole.com/public/serbook/redirect.php?url=https://sportsbettingooo13.blogspot.com/2022/11/nice-versus-fc-koln-forecast-and.html-of-gathering-an-and-which-groups-could-they-play-if-they-fail
http://shop-navi.com/link.php?mode=link&id=192&url=https://sportsbettingooo13.blogspot.com/2022/11/nice-versus-fc-koln-forecast-and.html
http://www.superiorfemdom.com/cgi-bin/sites/out.cgi?id=dominell&url=https://sportsbettingooo13.blogspot.com/2022/11/nice-versus-fc-koln-forecast-and.html
https://flypoet.toptenticketing.com/index.php?url=https://sportsbettingooo13.blogspot.com/2022/11/nice-versus-fc-koln-forecast-and.html
http://whatsthecost.com/linktrack.aspx?url=https://sportsbettingooo13.blogspot.com/2022/11/nice-versus-fc-koln-forecast-and.html
http://models.world-collections.com/cgi-bin/df/out.cgi?ses=jVEuX3QqC0&id=831&url=https://sportsbettingooo13.blogspot.com/2022/11/nice-versus-fc-koln-forecast-and.html
http://www.horesga.de/click/advertisement/195?url=https://sportsbettingooo13.blogspot.com/2022/11/nice-versus-fc-koln-forecast-and.html
http://kennel-makalali.de/gbook/go.php?url=https://sportsbettingooo13.blogspot.com/2022/11/nice-versus-fc-koln-forecast-and.html
https://www.d-e-a.eu/newsletter/redirect.php?link=https://sportsbettingooo13.blogspot.com/2022/11/nice-versus-fc-koln-forecast-and.html
http://bulletformyvalentine.info/go.php?url=https://sportsbettingooo13.blogspot.com/2022/11/nice-versus-fc-koln-forecast-and.html
http://ibmp.ir/link/redirect?url=https://sportsbettingooo13.blogspot.com/2022/11/nice-versus-fc-koln-forecast-and.html
http://www.cnainterpreta.it/redirect.asp?url=https://sportsbettingooo13.blogspot.com/2022/11/nice-versus-fc-koln-forecast-and.html
http://www.eroticlinks.net/cgi-bin/atx/out.cgi?id=25&tag=topz&trade=https://sportsbettingooo13.blogspot.com/2022/11/nice-versus-fc-koln-forecast-and.html
https://images.google.com.mx/url?sa=t&url=https://sportstoto7.com/
https://images.google.com.mt/url?sa=t&url=https://sportstoto7.com/
https://images.google.com.ly/url?sa=t&url=https://sportstoto7.com/
https://images.google.com.lb/url?sa=t&url=https://sportstoto7.com/
https://images.google.com.kw/url?sa=t&url=https://sportstoto7.com/
https://images.google.com.kh/url?sa=t&url=https://sportstoto7.com/
https://images.google.com.my/url?sa=t&url=https://sportstoto7.com/
https://images.google.com.mx/url?sa=t&url=https://sportstoto7.com/
https://images.google.com.mt/url?sa=t&url=https://sportstoto7.com/
https://images.google.com.ly/url?sa=t&url=https://sportstoto7.com/
https://images.google.com.lb/url?sa=t&url=https://sportstoto7.com/
https://images.google.com.kw/url?sa=t&url=https://sportstoto7.com/
https://images.google.com.kh/url?sa=t&url=https://sportstoto7.com/
https://spb90.ru/bitrix/redirect.php?goto=https://sportstoto7.com/
http://spbstroy.ru/bitrix/redirect.php?goto=https://sportstoto7.com/
http://speakrus.ru/links.php?go=https://sportstoto7.com/
http://staldver.ru/go.php?go=https://sportstoto7.com/
http://www.stalker-modi.ru/go?https://sportstoto7.com/
https://www.star174.ru/redir.php?url=https://sportstoto7.com/
https://staten.ru/bitrix/rk.php?goto=https://sportstoto7.com/
https://stav-geo.ru/go?https://sportstoto7.com/
http://stopcran.ru/go?https://sportstoto7.com/
https://store-pro.ru/go?https://sportstoto7.com/
https://strelmag.ru/bitrix/rk.php?goto=https://sportstoto7.com/
https://stroim100.ru/redirect?url=https://sportstoto7.com/
https://stroymet-shop.ru/bitrix/rk.php?goto=https://sportstoto7.com/
https://stroysar.ru/links.php?go=https://sportstoto7.com/
http://stroysoyuz.ru/bitrix/rk.php?goto=https://sportstoto7.com/
http://studioad.ru/go?https://sportstoto7.com/
http://supcourt.ru/bitrix/redirect.php?goto=https://sportstoto7.com/
http://www.survivalbook.ru/forum/go.php?https://sportstoto7.com/
https://sutd.ru/links.php?go=https://sportstoto7.com/
http://www.sv-mama.ru/shared/go.php?url=https://sportstoto7.com/
https://sportstoto7.com/
https://www.socialstudies.org/search-results?search=https%3A%2F%2Fsportstoto7.com
https://igofurniture.com/search?q=https%3A%2F%2Fsportstoto7.com%2F
https://www.eatthis.com/?s=https%3A%2F%2Fsportstoto7.com%2F
https://www.nbcnews.com/search/?q=https%3A%2F%2Fsportstoto7.com%2F
https://discover.hubpages.com/search?query=https%3A%2F%2Fsportstoto7.com
https://en.wikipedia.org/w/index.php?search=https%3A%2F%2Fsportstoto7.com%2F&title=Special:Search&profile=advanced&fulltext=1&ns0=1
https://wordpress.org/search/https%3A%2F%2Fsportstoto7.com%2F/
https://www.istockphoto.com/nl/search/2/image?phrase=https%3A%2F%2Fsportstoto7.com%2F
https://github.com/search?q=https%3A%2F%2Fsportstoto7.com%2F&type=https%3A%2F%2Fwww.youtube.com%2Fresults%3F
https://play.google.com/store/search?q=https%3A%2F%2Fsportstoto7.com%2F
https://globoplay.globo.com/busca/?q=www.sportstoto7.com
https://www.hugedomains.com/domain_search.cfm?domain_name=www.sportstoto7.com
https://www.reuters.com/site-search/?query=www.sportstoto7.com&offset=0
https://www.brandbucket.com/search?q=www.sportstoto7.com
https://www.gmanetwork.com/news/#/search;query=https:%2F%2Fsportstoto7.com%2F
https://s.howstuffworks.com/serp?q=www.sportstoto7.com&sc=h0PcdUrb0RYI00
https://www.collinsdictionary.com/spellcheck/english?q=www.sportstoto7.com
https://www.webmd.com/search/search_results/default.aspx?query=www.sportstoto7.com
https://www.humboldt.edu/results?cx=016116879625100262331%3Anyxfuocjlyc&cof=FORID%3A11&gq=www.sportstoto7.com
https://www.who.int/home/search?indexCatalogue=genericsearchindex1&searchQuery=www.sportstoto7.com&wordsMode=AnyWord
https://github.com/composer/composer/search?q=www.sportstoto7.com
https://www.sciencedirect.com/search?qs=www.sportstoto7.com
https://www.yuchip-led.com/?s=www.sportstoto7.com
https://open.letters.international//searchquery=www.sportstoto7.com&scope=site&showTabs=false
https://training.seer.cancer.gov/search?q=https%3A%2F%2Fsportstoto7.com%2F
https://www.maoritelevision.com/search/all/https%3A//sportstoto7.com/
https://www.maoritelevision.com/search/all/https%3A//sportstoto7.com/
https://www.tvnz.co.nz/search?q=https%3A%2F%2Fsportstoto7.com%2F
https://web.archive.org/web/20220317090539/https://sportstoto7.com/
https://www.sbs.com.au/search?query=https%3A%2F%2Fsportstoto7.com%2F&p=1
https://search-beta.abc.net.au/#/?query=https%3A%2F%2Fsportstoto7.com%2F&page=1&configure%5BgetRankingInfo%5D=true&configure%5BclickAnalytics%5D=true&configure%5BuserToken%5D=anonymous-472a3745-320a-475e-822a-c3beac643ccb&configure%5BhitsPerPage%5D=10
https://www.srf.ch/programm/tv/suche?q=https%3A%2F%2Fsportstoto7.com%2F
https://code.google.com/archive/search?q=https:%2F%2Fsportstoto7.com%2F
https://www.ncbi.nlm.nih.gov/pmc/?term=https%3A%2F%2Fsportstoto7.com%2F
https://orthoinfo.aaos.org/en/search/?q=https%3A%2F%2Fsportstoto7.com%2F
judy, [13/05/2022 3:46 PM]
https://sportstoto7.com/
https://www.rprofi.ru/bitrix/rk.php?goto=https://sportstoto7.com/
https://adengine.old.rt.ru/go.jsp?to=https://sportstoto7.com/
http://www.rtkk.ru/bitrix/rk.php?goto=https://sportstoto7.com/
http://www.rucem.ru/doska/redirect/?go=https://sportstoto7.com/
https://www.ruchnoi.ru/ext_link?url=https://sportstoto7.com/
http://ruiframe.ru/out.php?link=https://sportstoto7.com/
http://www.runiwar.ru/go?https://sportstoto7.com/
https://rusq.ru/go.php?https://sportstoto7.com/
http://2010.russianinternetweek.ru/bitrix/rk.php?goto=https://sportstoto7.com/
https://www.russianrobotics.ru/bitrix/rk.php?goto=https://sportstoto7.com/
http://rybackij-prival.ru/go?https://sportstoto7.com/
http://www.ryterna.ru/bitrix/redirect.php?goto=https://sportstoto7.com/
http://rzngmu.ru/go?https://sportstoto7.com/
https://s-online.ru/bitrix/redirect.php?goto=https://sportstoto7.com/
https://salapin.ru/redirect.php?num_lnk=33036&nm_url=https://sportstoto7.com/
http://samaraenergo.ru/bitrix/rk.php?goto=https://sportstoto7.com/
https://www.samovar-forum.ru/go?https://sportstoto7.com/
http://san-house.ru/bitrix/rk.php?goto=https://sportstoto7.com/
https://sbereg.ru/links.php?go=https://sportstoto7.com/
http://sbtg.ru/ap/redirect.aspx?l=https://sportstoto7.com/
https://sellsee.ru/pp.php?i=https://sportstoto7.com/
http://www.semtex.ru/go.php?a=https://sportstoto7.com/
http://sennheiserstore.ru/bitrix/rk.php?goto=https://sportstoto7.com/
https://seoandme.ru/bitrix/redirect.php?goto=https://sportstoto7.com/
http://visits.seogaa.ru/redirect/?g=https://sportstoto7.com/
https://www.serie-a.ru/bitrix/redirect.php?goto=https://sportstoto7.com/
http://sevensport.ru/go.php?to=https://sportstoto7.com/
https://www.sgvavia.ru/go?https://sportstoto7.com/
http://shckp.ru/ext_link?url=https://sportstoto7.com/
https://sherif-karter.ru/bitrix/redirect.php?goto=https://sportstoto7.com/
https://shinglas.ru/bitrix/redirect.php?goto=https://sportstoto7.com/
https://shtilniisad.ru/bitrix/redirect.php?goto=https://sportstoto7.com/
https://www.shtrih-m.ru/bitrix/redirect.php?goto=https://sportstoto7.com/
https://www.sibpsa.ru/bitrix/redirect.php?goto=https://sportstoto7.com/
https://sibran.ru/bitrix/redirect.php?goto=https://sportstoto7.com/
https://www.sibsiu.ru/bitrix/rk.php?goto=https://sportstoto7.com/
http://simvol-veri.ru/xp/?goto=https://sportstoto7.com/
https://www.sinetic.ru/bitrix/redirect.php?goto=https://sportstoto7.com/
http://sintez-oka.ru/bitrix/redirect.php?goto=https://sportstoto7.com/
https://lk.sistemagorod.ru/lk/away?to=https://sportstoto7.com/
https://lk.sistemagorod.ru/lk/away?to=https://sportstoto7.com/
https://skamata.ru/bitrix/redirect.php?goto=https://sportstoto7.com/
https://www.skamata.ru/bitrix/redirect.php?event1=cafesreda&event2=&event3=&goto=https://sportstoto7.com/
https://skibaza.ru/bitrix/rk.php?goto=https://sportstoto7.com/
http://www.skladcom.ru/(S(qdiwhk55jkcyok45u4ti0a55))/banners.aspx?url=https://sportstoto7.com/
http://mias.skoda-avto.ru/bitrix/redirect.php?event1=news_out&event2=&goto=https://sportstoto7.com/
http://slotex.ru/bitrix/redirect.php?goto=https://sportstoto7.com/
https://smartservices.ru/bitrix/rk.php?goto=https://sportstoto7.com/
http://smartsourcing.ru/link?https://sportstoto7.com/
https://smolkassa.ru/?b=1&r=https://sportstoto7.com/
http://portalnp.snauka.ru/bitrix/redirect.php?goto=https://sportstoto7.com/
https://www.sobyanin.ru/metrics/r/?muid=b10710a6-9c4e-469f-8dce-4a37ef6b646b&category=4bd2ab6d-286b-4cec-84c4-89728dedb630&url=https://sportstoto7.com/
https://socport.ru/redirect?url=https://sportstoto7.com/
http://www.sofion.ru/banner.php?r1=41&r2=2234&goto=https://sportstoto7.com/
http://solo-center.ru/links.php?go=https://sportstoto7.com/
https://sovaisova.ru/bitrix/redirect.php?event1=2009_mainpage&event2=go_www&event3=&goto=https://sportstoto7.com/
https://www.spacioclub.ru/forumscript/url/?go=https://sportstoto7.com/
https://spartak.ru/bitrix/redirect.php?goto=https://sportstoto7.com/
http://school364.spb.ru/bitrix/rk.php?goto=https://sportstoto7.com/
SPORTSTOTO7.COM
https://www.rprofi.ru/bitrix/rk.php?goto=https://sportstoto7.com/
https://adengine.old.rt.ru/go.jsp?to=https://sportstoto7.com/
http://www.rucem.ru/doska/redirect/?go=https://sportstoto7.com/
https://www.ruchnoi.ru/ext_link?url=https://sportstoto7.com/
http://ruiframe.ru/out.php?link=https://sportstoto7.com/
http://www.runiwar.ru/go?https://sportstoto7.com/
https://rusq.ru/go.php?https://sportstoto7.com/
http://2010.russianinternetweek.ru/bitrix/rk.php?goto=https://sportstoto7.com/
https://www.russianrobotics.ru/bitrix/rk.php?goto=https://sportstoto7.com/
http://www.ryterna.ru/bitrix/redirect.php?goto=https://sportstoto7.com/
http://rzngmu.ru/go?https://sportstoto7.com/
https://s-online.ru/bitrix/redirect.php?goto=https://sportstoto7.com/
http://samaraenergo.ru/bitrix/rk.php?goto=https://sportstoto7.com/
https://www.samovar-forum.ru/go?https://sportstoto7.com/
http://san-house.ru/bitrix/rk.php?goto=https://sportstoto7.com/
https://sbereg.ru/links.php?go=https://sportstoto7.com/
https://sellsee.ru/pp.php?i=https://sportstoto7.com/
http://www.semtex.ru/go.php?a=https://sportstoto7.com/
http://sennheiserstore.ru/bitrix/rk.php?goto=https://sportstoto7.com/
https://seoandme.ru/bitrix/redirect.php?goto=https://sportstoto7.com/
http://visits.seogaa.ru/redirect/?g=https://sportstoto7.com/
https://www.serie-a.ru/bitrix/redirect.php?goto=https://sportstoto7.com/
https://www.sgvavia.ru/go?https://sportstoto7.com/
http://shckp.ru/ext_link?url=https://sportstoto7.com/
https://www.shtrih-m.ru/bitrix/redirect.php?goto=https://sportstoto7.com/
https://www.sibpsa.ru/bitrix/redirect.php?goto=https://sportstoto7.com/
https://sibran.ru/bitrix/redirect.php?goto=https://sportstoto7.com/
http://simvol-veri.ru/xp/?goto=https://sportstoto7.com/
https://www.sinetic.ru/bitrix/redirect.php?goto=https://sportstoto7.com/
http://sintez-oka.ru/bitrix/redirect.php?goto=https://sportstoto7.com/
https://skamata.ru/bitrix/redirect.php?goto=https://sportstoto7.com/
https://skibaza.ru/bitrix/rk.php?goto=https://sportstoto7.com/
http://www.skladcom.ru/(S(qdiwhk55jkcyok45u4ti0a55))/banners.aspx?url=https://sportstoto7.com/
http://mias.skoda-avto.ru/bitrix/redirect.php?event1=news_out&event2=&goto=https://sportstoto7.com/
https://smartservices.ru/bitrix/rk.php?goto=https://sportstoto7.com/
http://smartsourcing.ru/link?https://sportstoto7.com/
https://smolkassa.ru/?b=1&r=https://sportstoto7.com/
http://portalnp.snauka.ru/bitrix/redirect.php?goto=https://sportstoto7.com/
https://www.sobyanin.ru/metrics/r/?muid=b10710a6-9c4e-469f-8dce-4a37ef6b646b&category=4bd2ab6d-286b-4cec-84c4-89728dedb630&url=https://sportstoto7.com/
https://socport.ru/redirect?url=https://sportstoto7.com/
http://www.sofion.ru/banner.php?r1=41&r2=2234&goto=https://sportstoto7.com/
http://solo-center.ru/links.php?go=https://sportstoto7.com/
https://sovaisova.ru/bitrix/redirect.php?event1=2009_mainpage&event2=go_www&event3=&goto=https://sportstoto7.com/
https://www.spacioclub.ru/forum_script/url/?go=https://sportstoto7.com/
https://spartak.ru/bitrix/redirect.php?goto=https://sportstoto7.com/
http://school364.spb.ru/bitrix/rk.php?goto=https://sportstoto7.com/
https://spb90.ru/bitrix/redirect.php?goto=https://sportstoto7.com/
http://spbstroy.ru/bitrix/redirect.php?goto=https://sportstoto7.com/
http://speakrus.ru/links.php?go=https://sportstoto7.com/
http://staldver.ru/go.php?go=https://sportstoto7.com/
http://www.stalker-modi.ru/go?https://sportstoto7.com/
https://www.star174.ru/redir.php?url=https://sportstoto7.com/
https://staten.ru/bitrix/rk.php?goto=https://sportstoto7.com/
https://stav-geo.ru/go?https://sportstoto7.com/
http://stopcran.ru/go?https://sportstoto7.com/
https://store-pro.ru/go?https://sportstoto7.com/
https://strelmag.ru/bitrix/rk.php?goto=https://sportstoto7.com/
https://stroim100.ru/redirect?url=https://sportstoto7.com/
https://stroymet-shop.ru/bitrix/rk.php?goto=https://sportstoto7.com/
https://stroysar.ru/links.php?go=https://sportstoto7.com/
http://stroysoyuz.ru/bitrix/rk.php?goto=https://sportstoto7.com/
http://studioad.ru/go?https://sportstoto7.com/
http://supcourt.ru/bitrix/redirect.php?goto=https://sportstoto7.com/
http://www.survivalbook.ru/forum/go.php?https://sportstoto7.com/
https://sutd.ru/links.php?go=https://sportstoto7.com/
http://www.sv-mama.ru/shared/go.php?url=https://sportstoto7.com/
https://sportstoto7.com/
https://www.eatthis.com/?s=https%3A%2F%2Fsportstoto7.com%2F
https://www.nbcnews.com/search/?q=https%3A%2F%2Fsportstoto7.com%2F
https://discover.hubpages.com/search?query=https%3A%2F%2Fsportstoto7.com
https://en.wikipedia.org/w/index.php?search=https%3A%2F%2Fsportstoto7.com%2F&title=Special:Search&profile=advanced&fulltext=1&ns0=1
https://wordpress.org/search/https%3A%2F%2Fsportstoto7.com%2F/
https://www.istockphoto.com/nl/search/2/image?phrase=https%3A%2F%2Fsportstoto7.com%2F
https://github.com/search?q=https%3A%2F%2Fsportstoto7.com%2F&type=https%3A%2F%2Fwww.youtube.com%2Fresults%3F
https://play.google.com/store/search?q=https%3A%2F%2Fsportstoto7.com%2F
https://globoplay.globo.com/busca/?q=www.sportstoto7.com
https://www.hugedomains.com/domain_search.cfm?domain_name=www.sportstoto7.com
https://www.brandbucket.com/search?q=www.sportstoto7.com
https://www.webmd.com/search/search_results/default.aspx?query=www.sportstoto7.com
https://www.humboldt.edu/results?cx=016116879625100262331%3Anyxfuocjlyc&cof=FORID%3A11&gq=www.sportstoto7.com
https://www.who.int/home/search?indexCatalogue=genericsearchindex1&searchQuery=www.sportstoto7.com&wordsMode=AnyWord
https://github.com/composer/composer/search?q=www.sportstoto7.com
https://www.sciencedirect.com/search?qs=www.sportstoto7.com
https://www.yuchip-led.com/?s=www.sportstoto7.com
https://open.letters.international/_/searchquery=www.sportstoto7.com&scope=site&showTabs=false
https://training.seer.cancer.gov/search?q=https%3A%2F%2Fsportstoto7.com%2F
https://www.maoritelevision.com/search/all/https%3A//sportstoto7.com/
https://www.maoritelevision.com/search/all/https%3A//sportstoto7.com/
https://www.tvnz.co.nz/search?q=https%3A%2F%2Fsportstoto7.com%2F
https://web.archive.org/web/20220317090539/https://sportstoto7.com/
https://www.sbs.com.au/search?query=https%3A%2F%2Fsportstoto7.com%2F&p=1
https://search-beta.abc.net.au/#/?query=https%3A%2F%2Fsportstoto7.com%2F&page=1&configure%5BgetRankingInfo%5D=true&configure%5BclickAnalytics%5D=true&configure%5BuserToken%5D=anonymous-472a3745-320a-475e-822a-c3beac643ccb&configure%5BhitsPerPage%5D=10
https://www.srf.ch/programm/tv/suche?q=https%3A%2F%2Fsportstoto7.com%2F
https://code.google.com/archive/search?q=https:%2F%2Fsportstoto7.com%2F
https://www.ncbi.nlm.nih.gov/pmc/?term=https%3A%2F%2Fsportstoto7.com%2F
https://orthoinfo.aaos.org/en/search/?q=https%3A%2F%2Fsportstoto7.com%2F
Leave a comment